Overview
Bluetooth Low Energy technology allows FieldScout data to stream to a smartphone when connected to the free iPhone or Android FieldScout Mobile app (item 6453BT). FieldScout Mobile is designed to collect, store, and analyze measurement data from FieldScout meters equipped with a Bluetooth Low Energy radio.
To log in as a FieldScout Mobile—Pro user requires a SpecConnect FieldScout Pro subscription (item 3035A, B, or C) and uses the same login credentials as the SpecConnect web portal & app (purchased separately, contact Spectrum to place an order). The FieldScout Mobile – Pro app automatically uploads measurement data to the SpecConnect web portal and launches enhanced features in the app not available in FieldScout Mobile – Basic. Enhanced features include Guided mode & Freeform mode, overlaying measurements on satellite imagery, writing notes/ comments associated with zones or sessions, and sharing information with other FieldScout Mobile—Pro users.
The TDR350 (item 6435) and TruFirm (item 6490S) meters are already equipped with Bluetooth functionality. Bluetooth functionality for the TDR150 meter (item 6445) can be unlocked by purchasing item 6445GU. Bluetooth capability can be added to older TruFirm meters with the TruFirm Bluetooth radio board (item 6491S). Bluetooth capability can be added to TDR 300 with the FieldScout Bluetooth Device (item 6453BT) which mounts to the frame. The device plugs into the TDR’s computer port.
Home Screen
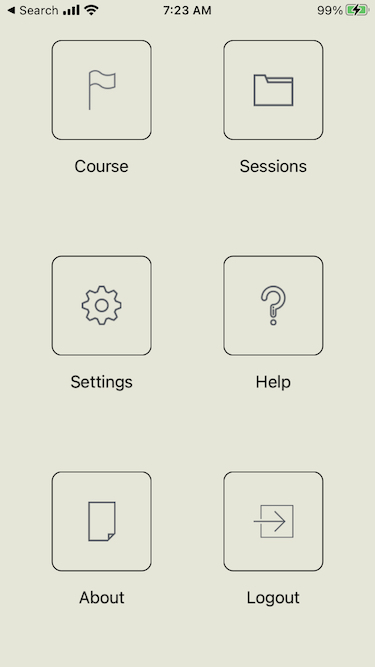
The Home screen (fig. 1) is displayed when the app is opened and the user has logged in. From the Home screen, you can navigate immediately to a Course/Farm, an existing Session, the Settings screen, and the About Spectrum page. From any other screen, the Home screen can be accessed by tapping the icon with 3 parallel, green lines (fig. 2) and selecting “Home” from the menu.

Specifications
Compatibility
- Apple Bluetooth Low Energy devices
- iPhone (4S and later)
- iPad (Air, Mini, or 3rd generation or later)
- iPod Touch (5th generation or later)
- Android Bluetooth Low Energy devices (partial list)
- Samsung Galaxy series
- HTC One and later
- Motorola Droid RAZR, Maxx, Mini, Moto G, X
- Nexus 4 and later
- Spectrum devices
- TDR 350
- TDR 150 with Bluetooth activated via item 6445GU
- TDR 300 with the FieldScout Bluetooth device (item 6453BT)
- TruFirm item 6490S
- Trufirm item 6490 with Trufirm Bluetooth Radio board (item 6491S)
Getting Started
Get your Bluetooth-enabled FieldScout TDR or TruFirm working with FieldScout Mobile in the following eight steps.
1. Get the app: FieldScout Mobile
Search ‘FieldScout’ in the Apple App Store or Android Google Play Store.
2. Attach Bluetooth Device (TDR 300 only). Turn on FieldScout Meter and Bluetooth
TruFirm: Press the ON button to power-up both the meter & the Bluetooth.
TDR 150/350: Enable the Bluetooth capability on the meter’s menu screen.
TDR 300: Press the ON button on both the meter & the Bluetooth Device to power-up. (LED will indicate the Bluetooth status, flashes red when ready to connect)
3. Open FieldScout Mobile
Select Basic login or use SpecConnect credentials for FieldScout Pro login.
4. Add New Course or Farm
Select a Course/Farm or tap ![]() to add a New Course/Farm. Each course/farm corresponds to a different location.
to add a New Course/Farm. Each course/farm corresponds to a different location.
If you are using FieldScout Mobile—Pro capability, you can use the import icon ![]() to import courses already configured on the server.
to import courses already configured on the server.
5. Start New Session
A session represents a sampling date/time. SpecConnect reports use sessions to organize data.
Select meter type and give the session a name (optional).
6. Connect App to Bluetooth
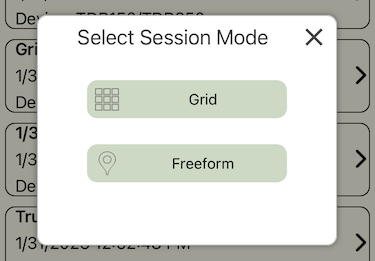
Select Session mode (grid or freeform).
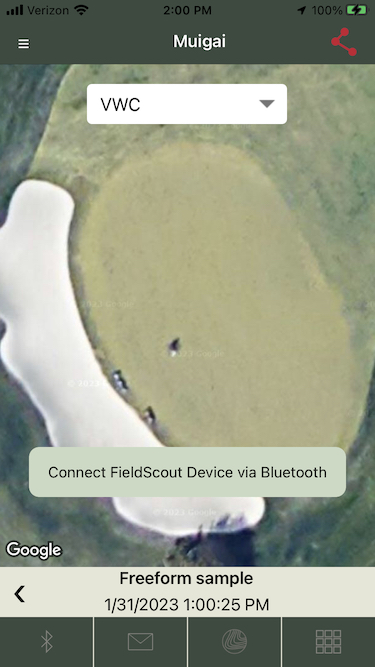
For Grid Mode, select the desired hole & surface (or a field if you are using Farm mode). Tap a zone/sub-grid within the grid to enter the Take Readings screen for this portion of the gridded area. To initiate a connection to the FieldScout device tap the “Connect FieldScout Device via Bluetooth” button.
The “Connect FieldScout Device via Bluetooth” button is visible on the main Freeform Mode page.
If there is no “Connect FieldScout Device via Bluetooth” button displayed, then your mobile device is already connected to a FieldScout device. To disconnect, tap the Bluetooth icon ![]() at the bottom of the Freeform or Sub-Grid page where readings are taken.
at the bottom of the Freeform or Sub-Grid page where readings are taken.
7. Take Measurements
As you take readings on the FieldScout device, these readings will stream to the app. If you are using FieldScout Mobile—Pro, readings are also sent to the SpecConnect server.
For Grid Mode, tap the grid icon ![]() to return to the main grid screen to select the next sampling zone.
to return to the main grid screen to select the next sampling zone.
For Freeform Mode, the reading locations are tracked automatically by GPS.
Connecting a FieldScout Device to the FieldScout Mobile App
The Bluetooth radio (internal or external) must be connected to the FieldScout Mobile app running on the mobile device. For the TDR 300 meter, activate the Bluetooth Accessory. For the TruFirm and TDR 150/350 meters, the radio is activated when the meter is powered up. For some mobile device operating systems, it may be necessary to manually enable Location Services.
1. Activate Bluetooth feature on the smartphone or mobile device.
2. Open the app.
3. Tap the Course/Farm icon. Select an existing course or create, name, and select a new course.
4. Select an existing session or create, name, and select a new session. This will bring up the Select Session Mode screen (Fig. 1). Select whether you are using Grid or Freeform (Pro version only) mode to collect data.
5. a. For Grid mode, the Main Grid screen (Fig. 2a) will appear. To start taking readings tap the desired sub-grid zone.
b. For Freeform mode, the app will immediately transition to its Take Readings screen (Fig. 3).
6. If the app is not currently connected to the FieldScout device, a Connect FieldScout Device via Bluetooth button will appear (see Fig. 2b or Fig. 3). Tap this button to initiate a connection.
7. The app will search for available Bluetooth devices. Your FieldScout device should then appear in a list of discovered Bluetooth-advertising devices (Fig. 4).
The App will attempt to connect to a device you select here and, if successful, will be ready to take readings at this point (See Take Reading Screen).
Note: Although the device appears in the app, it may not show up on the phone’s list of Bluetooth devices.

Managing Courses/Farms
Before a new data collection session can be created, the location where that data will be taken must be selected. For the Golf setting, this will be a Course. For the Agriculture setting, this will be a Farm.
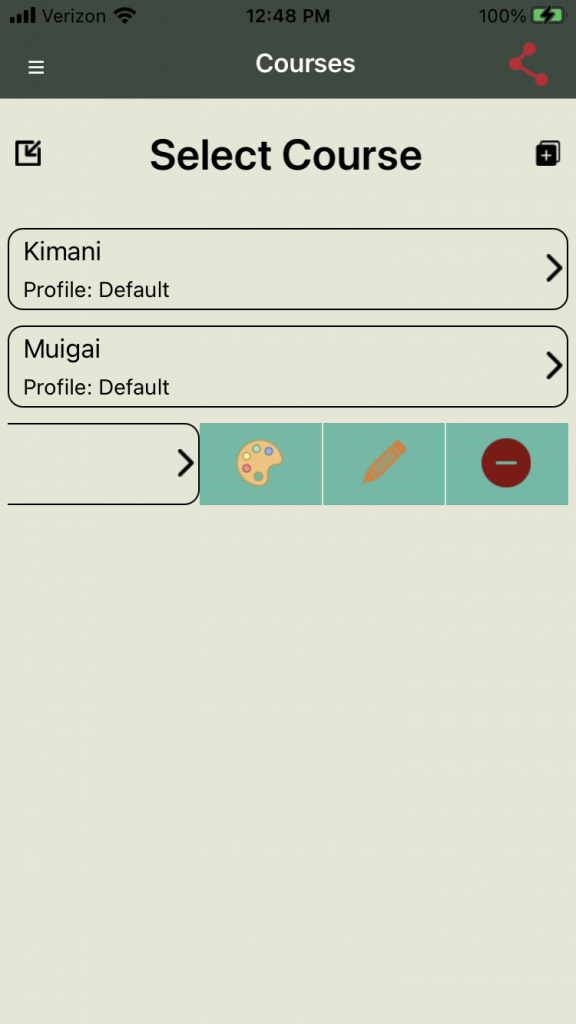
Selecting an Existing Course/Farm
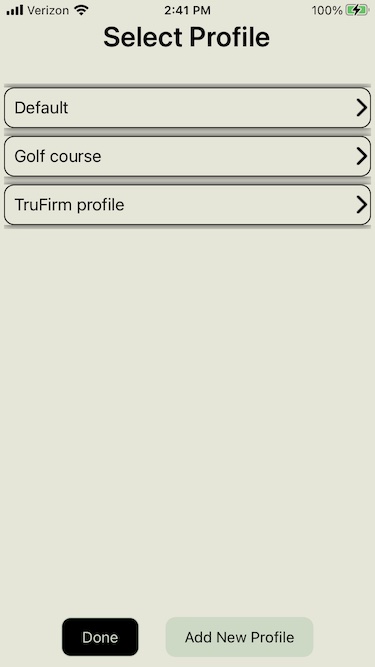
From the Home screen, tap the Course/Farm button. This will bring up the Select Course/Farm screen (Fig 1). Select the desired Course/Farm name from the list.
Creating a New Course/Farm
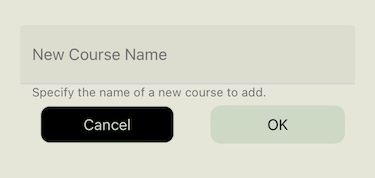
From the Select Course/Farm screen, tap the ![]() button to add a new Course/Farm. Enter the new name on the Course/Farm Name screen (Fig 2) and tap the Start button. This will take you back to the Select Course/Farm screen with the new course included in the list.
button to add a new Course/Farm. Enter the new name on the Course/Farm Name screen (Fig 2) and tap the Start button. This will take you back to the Select Course/Farm screen with the new course included in the list.
Pro users may import any Courses which may already be configured on the SpecConnect server portal by tapping the import ![]() button on the Course page.
button on the Course page.
Changing the Color Profile
Tap the color palette icon to bring up the list of color profiles. This sets the color palette for sites on this course/farm (see Settings Screen).

Editing the Course/Farm Name
Tap the pencil icon to change the name of the course or farm.

Deleting a Course/Farm
A course or farm can be deleted from the list by tapping the red button.

Managing Sessions
Sessions
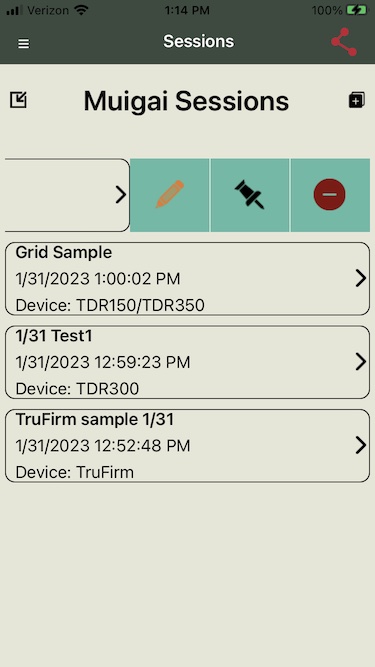
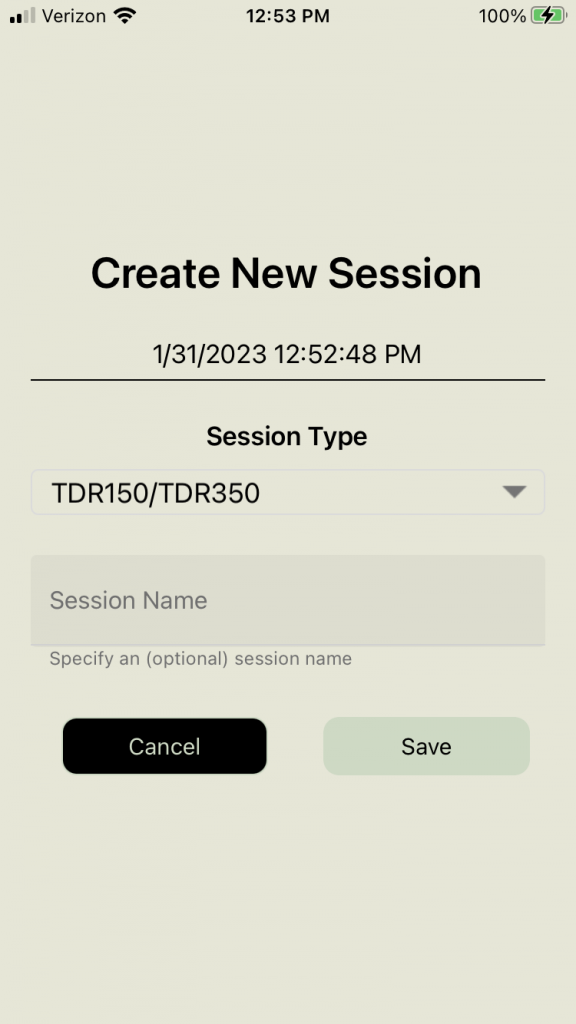
A data session identifies the date and time when data was collected. After selecting a course or farm location, the app will take you to the Select Sessions screen (Fig. 1). If you are beginning a new session, tap the ![]() button. This will bring up the Create New Session screen (Fig. 2). Name the session and identify the type of meter you are using. Tap the Save button to return to the Select Sessions screen. Otherwise, if you would like to continue an existing session, select it from the list.
button. This will bring up the Create New Session screen (Fig. 2). Name the session and identify the type of meter you are using. Tap the Save button to return to the Select Sessions screen. Otherwise, if you would like to continue an existing session, select it from the list.
If you are logged in to the Basic version of the App, your only data collection option is grid mode and you will be taken to the Main Grid screen.
If you are logged in to the Pro version of the App, after selecting a session, you will be taken to the Select Session Mode screen (Fig. 3). Select whether the data will be collected in Grid or Freeform mode. You will then be taken Main Grid screen or the Freeform Data screen.
Once in the data collection screen, it is also possible to navigate between sessions for the same surface/field and hole (golf mode only) by tapping the green arrows on either side of the session identifier window.
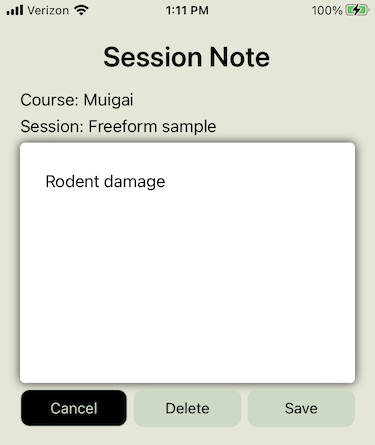
The red “minus” button allows you to delete a session. The green thumbtack icon allows notes to be included with the session (Fig. 4).
FieldScout Pro users may import or update existing or past sessions from the SpecConnect server by tapping the import button ![]() on the Sessions screen. The user will be prompted for a date and all sessions created on that date will be imported into the app EXCEPT any sessions which were originally created on the mobile device AND which still exist within the app. Any sessions which have been imported can be re-imported to update any readings which may have been taken since the session was last imported. This allows a user to monitor a session where readings are being actively updated on a different mobile device. Sessions can likewise be updated after being imported to allow different users to “transfer ownership” of a previously created session to continue taking readings on that session.
on the Sessions screen. The user will be prompted for a date and all sessions created on that date will be imported into the app EXCEPT any sessions which were originally created on the mobile device AND which still exist within the app. Any sessions which have been imported can be re-imported to update any readings which may have been taken since the session was last imported. This allows a user to monitor a session where readings are being actively updated on a different mobile device. Sessions can likewise be updated after being imported to allow different users to “transfer ownership” of a previously created session to continue taking readings on that session.
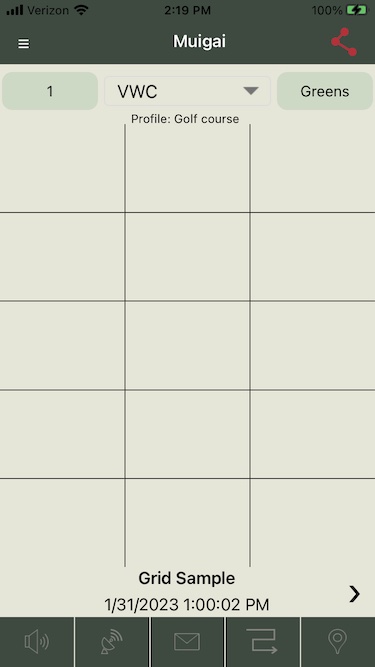
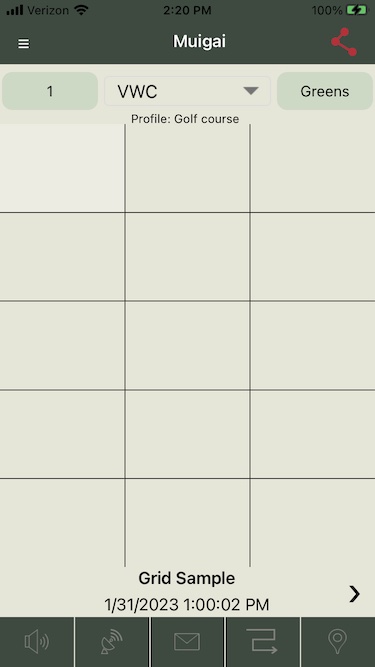
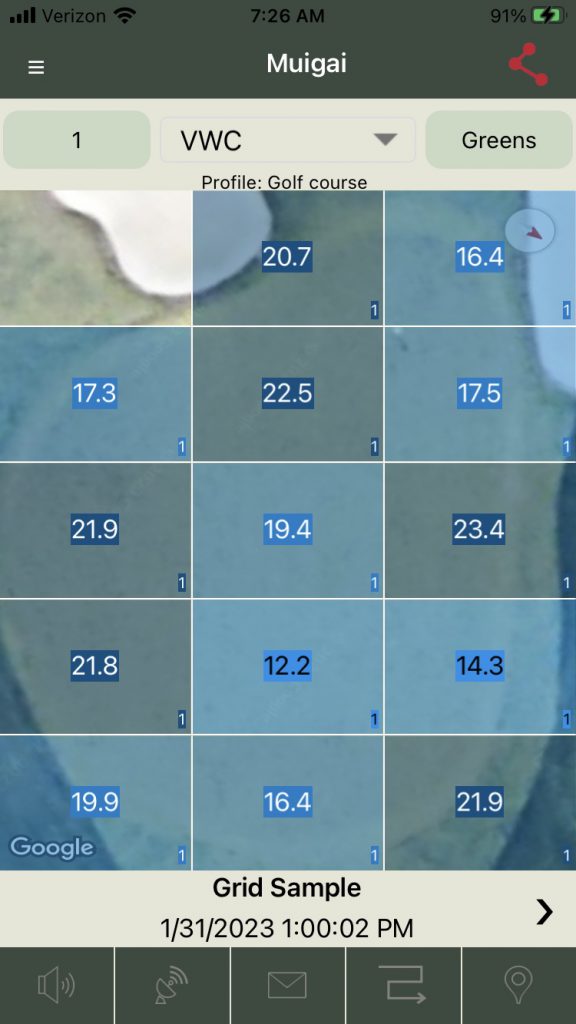
Main Grid Screen
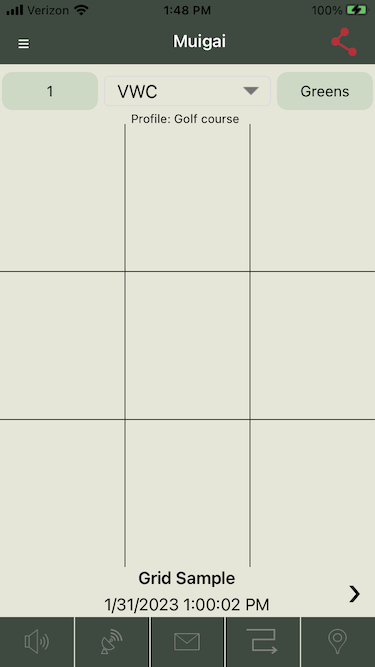
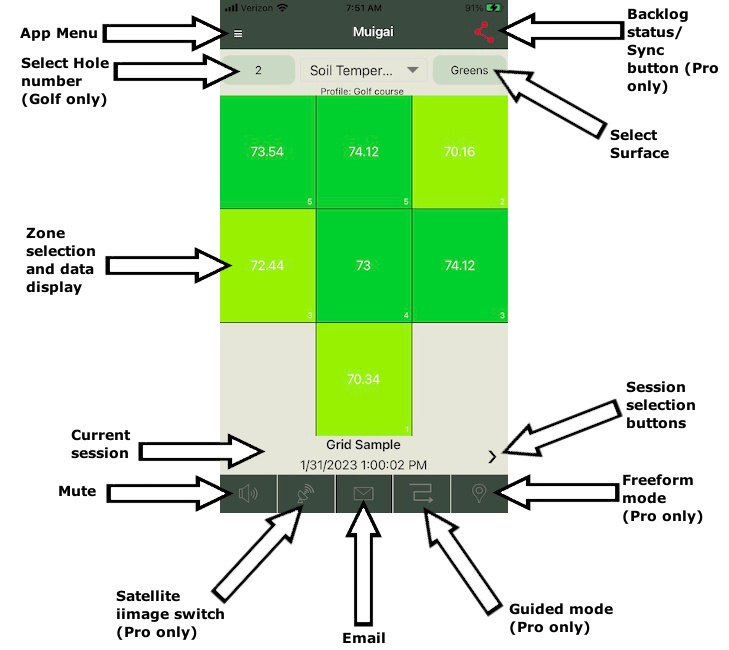
After selecting a grid mode session, you will be taken to the Main Grid screen. Here you can review the averaged data by hole and surface or access the measurement screen.
In Golf mode, select the hole number and surface type. Tap a zone to access the Take Reading screen and begin recording data to the app from the meter. Tap and hold on a zone to begin the process of creating a user-definable configuration of zones.
Farm mode (see Settings Screen) is similar but has no Select Hole option and the golf-specific surface names are removed.
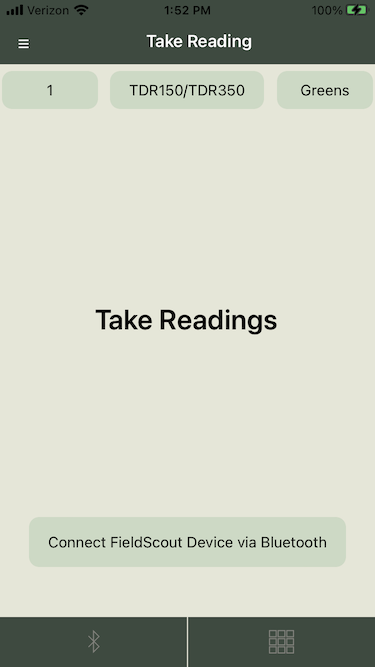
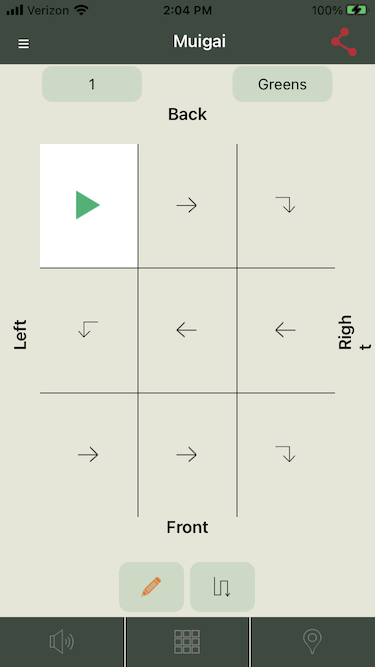
Take Reading Screen
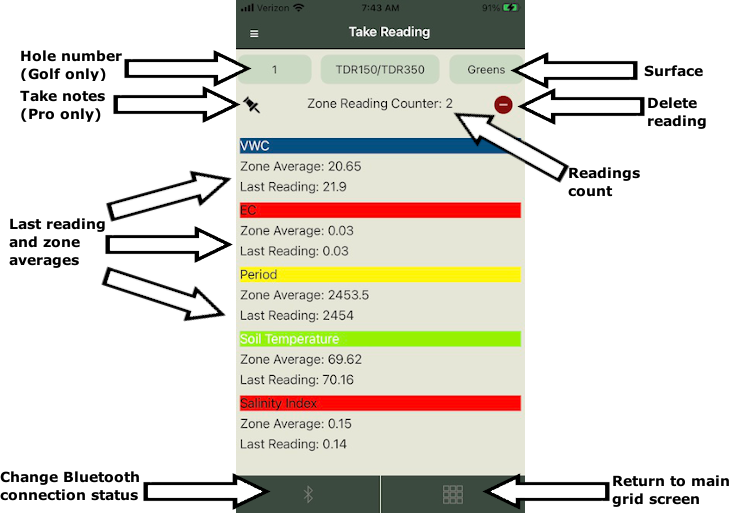
The Take Reading screen is displayed while making measurements in grid mode.
The value(s) measured by the FieldScout meter will be instantly transmitted to the app. Readings are automatically accepted and the zone’s reading counter and average value(s) are modified. Tap the Delete button to delete the most recent reading or all readings for this zone. When a reading is deleted, you are taken back to the Main Grid screen. Tapping the grid icon will also return you to the Main Grid screen. Continue taking measurements by selecting another zone or moving to a different surface/field. Tapping the Notes button allows you to enter notes on this specific zone.
Note: The hole number, meter type, and surface/field cannot be modified from this screen.
Freeform Mode
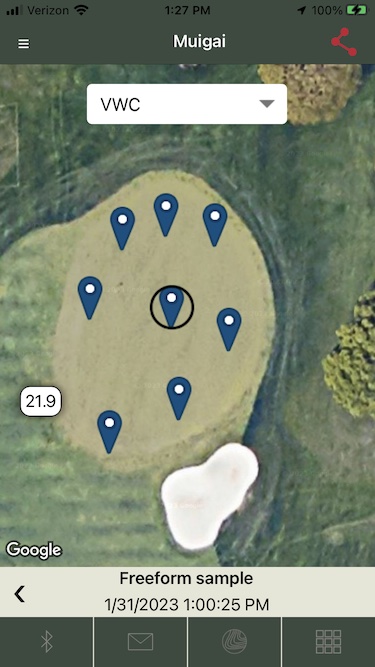
Freeform mode (Pro version only) allows the user to take measurements without the constraint of grid zones. Instead of averaging all measurements taken in a zone, each measurement taken in freeform mode will be shown independently as a color-coded push-pin icon (Fig. 1). The Freeform Data screen can be reached by selecting the Freeform option in the Select Session Mode screen or by clicking the Freeform Mode icon on the Main Grid screen.
Any pushpin can be moved. Press and hold the pushpin until it moves slightly above its current location. Slide your finger to the new position. When you release your finger, the pushpin will be placed in the new location. When a data point is moved, the GPS coordinates for that data point are also adjusted based on where they appear in the satellite image.
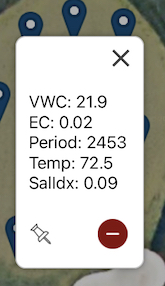
A snapshot of the data for any individual data point can be seen by pressing and quickly releasing one of the pushpins. This will bring up a data summary screen (Fig. 2). A note can be added to the data point by clicking the thumbtack icon. The red “minus” button allows you to delete the point. The “X” button closes the data summary screen.
There are 4 icons at the bottom of the screen.

The Bluetooth icon connects or disconnects the app to the FieldScout device.

The envelope icon opens up the phone’s email app and allows you to send a snapshot of the freeform map as an attached file.

The grid icon takes you to the Main Grid screen.

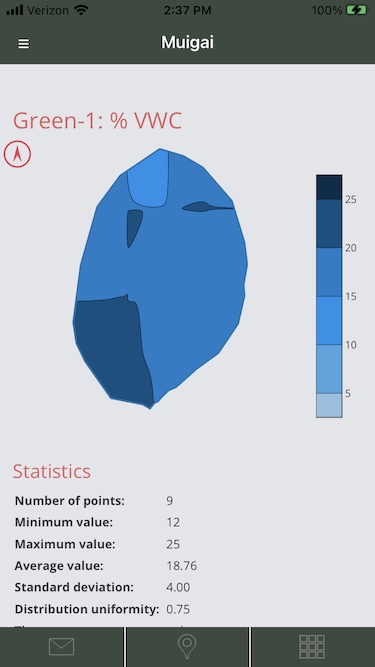
Renders a contour view of the current surface similar to the following image.
Guided Mode
Guided mode allows taking a complete set of grid readings at a surface (or field) without having to tap the grid location before entering each zone. It is selected by tapping the Guided Mode icon ![]() from the bottom of the Main Grid screen.
from the bottom of the Main Grid screen.
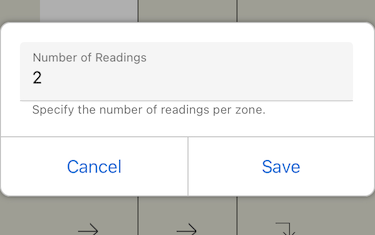
First, choose how many readings per zone to take (Fig. 1). This number can be modified by tapping the small pencil icon at the bottom of the zone sampling pattern screen (Fig. 2). Second, choose a horizontal or vertical serpentine path by tapping the appropriate button at the bottom of the zone sampling pattern screen. Click the first zone to start and begin taking measurements with the FieldScout meter. The app automatically progresses to the next zone after the required number of readings has been taken.
The app will track progress by highlighting the current zone and showing a readings counter in the bottom right corner of the zone.
Customizing the Shape of the Sampling Site
The Zone Editing menu (Fig. 1) is accessed by pressing and holding on any zone in the Main Grid screen. From here you can customize the configuration of zones at a given sampling location. This is useful for non-rectangular shaped sites such as a golf course green.
When a column is added, it is added on the far right side. When a row is added, it is added at the bottom. When a row or column is deleted, the row or column removed is the one in which that cell is located. The grid has a maximum of 5 rows and 5 columns. If the Delete this Cell option is selected, that individual cell will be deactivated and grayed out. The Add Cell option can only be used to re-activate cells that have already been removed. When a cell is added, the reading from that cell will re-appear. Figure 2 shows some examples of manipulating the default 3 x 3 grid to create a customized shape.

The final 2 options are only available for the Pro version. The Add Notes option is specific to the selected zone and is the same as the notes button on the Take Reading screen. The Set Profile option allows you to change the color profile associated with this grid (see Settings screen). If this option is set to “Default”, the course profile is used.
FieldScout Pro users have the option of creating Grid definitions using the SpecConnect portal Grid Editor. When the Pro app user navigates to the Grid page on the app, the user is prompted to import any new Grid definitions for the corresponding course or farm that may have been created using the SpecConnect Grid Editor.
Settings Screen
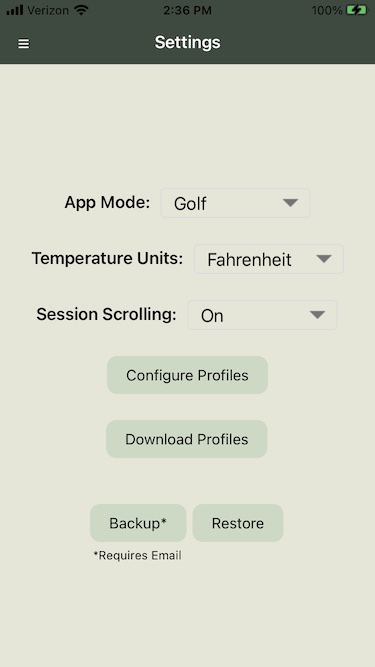
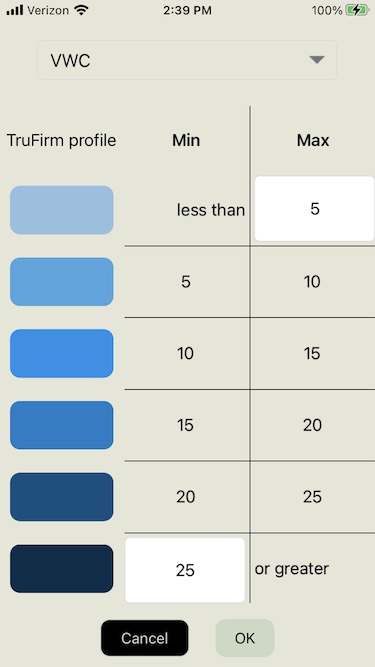
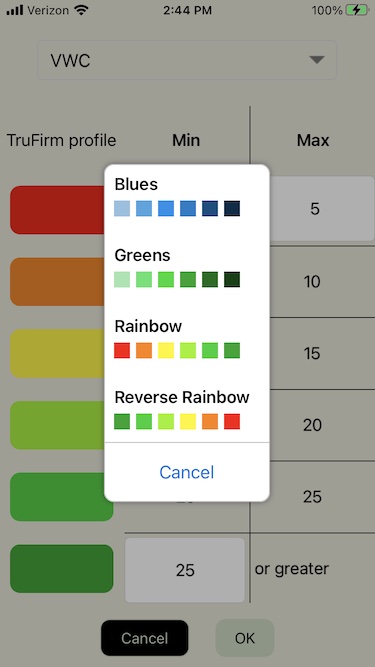
The Settings screen (Fig. 1) can be accessed from the Settings button on the Home screen. This screen is used to select whether the app runs in Golf or Farm mode. If it is being used with the TDR 350, select the units for temperature data. Within either mode, it is possible to choose which color profile is used in the (grid or freeform) data screen and how that color scheme is subdivided. Click the “Configure Profiles” button to display the current list of available color profiles (Fig. 2). Initially, only the Default profile will be displayed. Click the “Add New Profile” button to create a new profile. Type in the name of this profile and click “Save. Otherwise, select the profile you wish to use for the course or session of interest. The app then displays the legend scale screen (Fig. 3). The top toggle button allows you to indicate the data parameter for this scale. The options are TruFirm, VWC, EC, Period, and Temperature. To adjust the current values, enter values in the top (minimum value) field and bottom (maximum value) field. Only the high value for the lowest range and the low value for the highest range are entered in with the keypad. The rest of the legend is auto-filled. Pressing and holding one of the color panels will take you to the Color Profile screen (Fig. 4). You have the choice of 4 color schemes (Fig. 4). Select the desired scheme and tap the “OK” button to return to the legend scale screen. Tap the “OK” button to save the changes. Tap the “Cancel” button to ignore the changes. The app will then return to the Home screen.
selection screen
To backup the data any data gather by the FieldScout Mobile app tap the Backup button. The app will then create a backup file as an email attachment on your mobile device which you can then address and sent to an email recipient of your choosing. This attachment (once saved on this or another mobile device) may be used as an input file for a subsequent Restore on any device running the FieldScout Mobile app.
Pro users may import Profiles which may already have been configured on the SpecConnect server portal. Any profiles imported from the server will overwrite any existing Profiles with the same name. At this time Profiles created or modified on the phone or mobile device cannot be saved or updated on the SpecConnect server.
Satellite Images

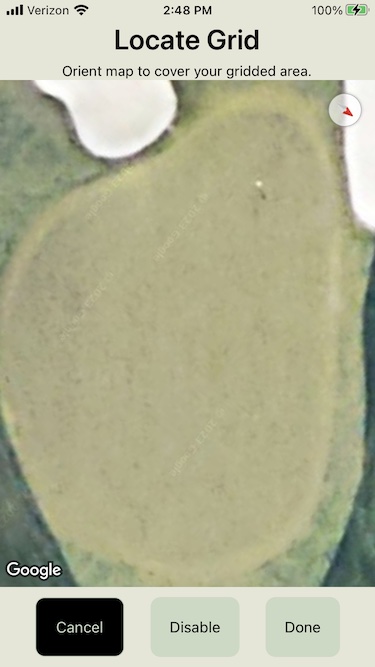
FieldScout Pro users can overlay measurement data on top of a satellite image of their site. The far-right image below (Figure 1c) illustrates how the combined data screen will look. Click the satellite button at the bottom of the Main screen to add the map. Initially, the map will be centered at the phone location. But, the image can be resized, moved, and rotated by pinching and swiping with your fingers. The GPS coordinates associated with the data laid over the image are for the center of the zone location. This enhanced image can be replicated in SpecConnect if it is assigned a GPS location in the app.
E-mailing Images

Both FieldScout Basic and Pro users can email images of their measurement grids. Click the email button at the bottom of the Main screen. Tap “Select Session” and select the session of interest from the list. Only sessions for the current Course/Farm will be listed. Tap the “Send Email” button to open the email app on your phone. Type in the destination of the email. The default email Subject is the date and time of the sampling session. This can be modified to something more descriptive. Text can also be entered into the body of the email. The images of the currently visible grid for that session will be sent as an attached file.
Managing Data in SpecConnect
Sending Data
FieldScout Pro users will automatically transmit their measurement data, as it’s taken, from the app to their SpecConnect web portal account when their phone is connected to a WiFi network or allows the use of cellular data. The SpecConnect icon in the top right indicates if the data is synced (Figure 1) or not (Figure 2). The Figure 2 icon will be display on the Grid or Freeform pages when data for the corresponding session has not been synced with the SpecConnect server. This is usually due to a degraded network connection to the server. When network conditions improve, tap the icon to sync any remaining un-synced session data.
The presence of the red-background icon (Figure 2) on the Course or Sessions pages indicates that there is un-synced data for one or more sessions. Tapping the icon on these pages will attempt to sync the data across all sessions.
Viewing Data
There are two ways to view data in SpecConnect. Identify the desired date range and select the session from the dropdown menu.
1. To view grid (Fig. 1) or freeform data for a selected parameter just as it appears in the app, select the device from the Equipment page. For data taken in Golf mode, use the surface dropdown list to scan to the selected hole and surface. Click the “Settings” button in the lower right corner to select a color profile and adjust the range scale in the same way as it is done in the app.

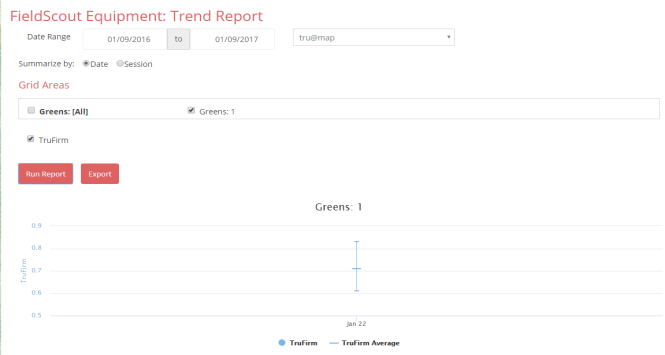
2. SpecConnect also offers a Trend Report (Fig. 2) for data taken with FieldScout meters. Select the surface and parameter of interest. The Trend Report will create box plots by date or by session. The average, maximum, and minimum values for each segment can be viewed by hovering the mouse over that segment.
Exporting Data
Use the Export button to download a comma delimited (.csv format) file of the selected session to your computer. Only the average data for a grid zone will be transferred to the exported data file.
TroubleShooting
1. Getting the “You have exceeded your SpecConnect FieldScout Pro device subscription limit. Please contact support.” message.
FieldScout devices require subscriptions to connect and record their data to SpecConnect. This message usually indicates that you have attempted to send data to SpecConnect using more FieldScout devices than your current subscription allotment. Contact Spectrum Technical Support if have purchased a subscription for this device, or Sales if you wish to purchase additional subscription capacity.